Turbo NABU using the MCLZ8

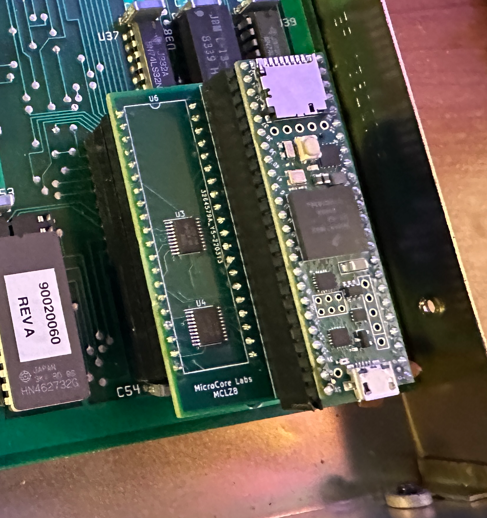
The Turbo NABU project is a drop-in replacement for the Z80 CPU on the NABU’s motherboard which does not emulate the processor but instead controls the motherboard resources using C code running on the 800 Mhz Teensy microcontroller.

The code is compiled using the Arduino GUI and runs directly on the Teensy 4.1’s 32-bit ARM A9 which is an 800Mhz+ superscalar CPU. This provides the ability to write C code to run on this fast CPU in the place of the vintage computer’s CPU!

The Turbo NABU has control over the Z80’s local bus so it has access to all of the motherboard’s peripherals which include the keyboard, video, sound, and anything else accessible by the Z80.

To access the NABU’s video and keyboard I have ported a printf, and scanf, and a small amount of code to access these resources. With these functions you can write programs using regular C code and use printf and scanf to accept input and display the results!

The Turbo NABU would be fun for people who would like to develop programs for this vintage computer while using the modern and easy to use Arduino tools. It is also fun to see these vintage machines running at ridiculously fast speeds!

The code is on GitHub: https://github.com/MicroCoreLabs/Projects/tree/master/Turbo_NABU

I uploaded a video to YouTube demonstrating the Turbo NABU:

Turbo NABU using the MCLZ8

TRS-NABU: TRS-80 Model I Running on a NABU Using the MCLZ8

I thought it would be a fun project to use the MCLZ8 to emulate the Zilog Z80, the TRS-80 Model I ROM BIOS and DRAM, and remap the keyboard and video to the motherboard resources of the NABU Personal Computer. Now the NABU is effectively acting like a Tandy TRS-80 Model 1!

This project was built quickly thanks to already having most pieces from existing projects and only took about an afternoon to complete.

The first step was to confirm that the MCLZ8 would work in the NABU as a replacement CPU for the Z80. The MCLZ8 was previously tested to work on the TRS-80 Model III which has a slower bus speed than the NABU, but it worked the first time without an issue.

Next I added some storage arrays in the MCLZ8 to store all of the NABU’s configuration IO accesses to the video chip and keyboard. This saved me a lot of time so I would not need to learn how these chips worked from the datasheets!

I then added the TRS-80 BIOS ROM and RAM emulation into the MCLZ8 so that all accesses to these memory ranges were handled in the Teensy using an array in C.

The NABU and TRS-80 have different video sizes with the NABU being 40×24 and 64×16 for the TRS-80. Since the NABU had more vertical space I was able to start the TRS-80 video downwards 8 lines which left room to keep the NABU splash screen which I thought is a neat effect! The TRS-80 has more columns so the NABU can only display 40 of them. The characters are still there in video memory, they are just not displayed. I used an array to convert the TRS-80 row/column mapping to the NABU which is faster than performing the math…

The NABU keyboard sends keystrokes as ASCII characters to an Intel 8251A on the motherboard, so I only needed to poll the UART’s status bit and read characters when they arrive. The TRS-80 performs parallel keyboard polling instead of using a UART so I needed to convert from the NABU’s ASCII to the address bit map for each TRS-80 keyboard polling address. This work was done on one of my previous projects which I was able to reuse.

So, that’s about it! The NABU now boots to the splash screen and then runs the TRS-80 Model I Level II BASIC. Below are a few pictures of the machine in action.

The code is here on GitHub:

This is a picture of random characters sent to the NABU’s video RAM. It was interesting to find that I need to add a delay of at least 50 uS between each write or else I would get corruption. I guess the chip needed time to transfer the write over to the dedicated video memory…

Here’s a picture of the MCLZ8 board replacing the Z80 CPU in the NABU motherboard

And here is a close-up of the MCLZ8:

TRS-NABU: TRS-80 Model I Running on a NABU Using the MCLZ8

MCLZ8 Fun with the NABU

Received my NABU today, and after some initial checks I tried replacing the Z80 with my MCLZ8. Seems to work fine – and fits in the machine perfectly!

Some ideas about what to do next:
– The MCLZ8 emulates the Z80 but can also emulate the BIOS ROM so I could try a number of the old and new ones out there.
– It might be simple to intercept and swap address ranges to run MSX cartridge ROMs on the NABU. 
– Can create some drivers for the video, sound, and keyboard to allow C code to be run the NABU using the 800 Mhz Teensy 4.1. Sort of like a “NABU Shield” for the Teensy.

MCLZ8 Fun with the NABU

Osborne 1 Debug with MCLZ8

I recently purchased an Osborne 1 computer which was not able to boot but was in very good cosmetic condition so I thought it would be a good opportunity to try the my MCLZ8 on another vintage Z80 machine.

When the computer is turned on it made a continuous beeping sound, the disk drive was running non-stop, and there was random data on the screen. The first step was to open the machine and test the voltages which were all within specifications. Actually, the first-first step was to put some tape over the speaker as this beep was very loud and annoying! 🙂

Next I removed the Z80 and installed the MCLZ8 to test DRAM for any issues. I added a few lines of code to the MCLZ8 after RESET was de-asserted to write and read from the 64KB of DRAM using BIU reads and writes. I found that the first three DRAM banks were ok and that there was a stuck bit on bit[5] of the fourth bank. Here is a pic of the socketed and replaced it with a spare DRAM from my Apple II+. You can even see the Apple logo on the chip!

After that the machine was able to print to the screen! This banner was, however, flashing continuously and it took me a while to understand that it was because there was a stuck key(s) on the keyboard. When the keyboard was unplugged the flashing went away.

I used a trick I found on the web to simulate an Enter-key keypress by shorting keyboard connector pins 3 and 15 momentarily. When this was done it went into a loop reporting BOOT ERROR. Light criticism, but would have more accurate to say there was no disk present…

At this point I believe the machine is ready to boot from diskette, but I don’t own any to test with!

It appears that the only issue with the computer is the stuck keyboard, so I will probably leave that to the next enthusiast to debug and solve!

The construction is a bit flimsy but it is an otherwise attractive machine. I like it!

And I am also happy that I was able to use my MCLZ8 to quickly isolate the faulty DRAM out of the 32 possibilities.

Osborne 1 Debug with MCLZ8

MCL86+ 8088 Accelerator Update

I updated the MCL86+ code with a new acceleration mode which mirrors 256KB of the IBM XT’s motherboard RAM and ROM using the Teensy 4.1 internal memory and disabling the 8088 cycle accuracy.

One obstacle was that the IBM PC uses DMA for disk accesses which results in the contents of motherboard DRAM being different than the contents on any mirrored memory inside of the MCL86+ emulator. The fix for this is to copy the physical memory over to the mirrored memory just before the acceleration is enabled. It also requires that, once this acceleration is enabled, one should use a virtual C disk so that DMA is not used. Using an XT-IDE would also probably work since it does not use DMA.

The results is a substantial performance increase! Some tools report that the IBM XT runs at speeds close to an 80386. Not bad for an inexpensive drop-in 8088 replacement processor – and outperforms the V20 by a wide margin!

MCL86+ 8088 Accelerator Update

TRS-80 Model I emulator uses MCLZ8 in a Teensy

I integrated the TRS-80 Model I ROMs into my MCLZ8 Z80 emulator and mapped the UART to the TRS-80’s keyboard and video RAM and now have it running on a standalone Teensy 4.1 board!

I am taking advantage of the high-speed USB UART to display the TRS-80 video RAM contents to the user. Whenever something is written to the video RAM, I simply output the complete 64×16 screen contents to the UART! It goes so fast that it looks like smooth motion – similar to flip-book animation.

In theory, it would be easy to map any memory or IO address to the Teensy’s GPIOs so one could write a BASIC program to control some pins on the board and could even implement a parallel bus… I am using the TRS-80 Model I ROMs at the moment. Probably no reason the Model III ROMs wouldn’t work just as well.

One other neat feature is that you can cut and paste a BASIC program into the UART window so you don’t need to type them in! 🙂

Source code is on GitHub: https://github.com/MicroCoreLabs/Projects/tree/master/MCLZ8/Code

TRS-80 Model I emulator uses MCLZ8 in a Teensy

MCLZ8 Videos – Games and Z80 Acceleration

I posted some videos to YouTube of a few games and also a small BASIC program to demonstrate the acceleration achieved when running the MCLZ8 is the maximum acceleration mode.

When using acceleration mode-3 which operates both RAM and ROM entirely inside of the Teensy and is accessed at 800Mhz, the total CPU speedup appears to be between 15x and 20x over the stock Z80! This is with “number crunching” only and not performing any video accesses which would slow down the CPU due to the video memory being located on the motherboard.

Video of Donkey Kong under NewDOS: https://www.youtubecom/watch?v=AHEyADtfJ3U

Video of Zaxxon under NewDOS: https://www.youtube.com/watch?v=NqiwF3rjT58

Video of Acceleration Demonstration under TRSDOS: https://www.youtube.com/watch?v=0iaphw76k6Q

I should have described the acceleration modes are in the videos, so ill correct that here:

Mode 0 – All external memory accesses
Mode 1 – Reads and writes are cycle accurate using internal memory with writes passing through to motherboard
Mode 2 – Reads accelerated using internal memory and writes are cycle accurate and pass through to motherboard
Mode 3 – All read and write accesses use accelerated internal memory

MCLZ8 Videos – Games and Z80 Acceleration

MCLZ8 – Testing Various Applications

My friend Ira Goldklang at http://www.trs-80.com sent me a number diskettes chock-full of applications to try on my MCLZ8 powered TRS-80 Model III. I’m happy to report that the testing was very successful! All of the DOS’s booted and allowed other diskette applications to be launched, all of the games that I tried seemed to fun fine, and some diagnostic programs reported happy results!

I plan to take a few videos soon, and one them will be of a diagnostic running with max acceleration which is rather amusing! So here are a few pictures of the progress so far and I will post more to this webpage as I try new applications and games

MCLZ8 – Testing Various Applications